Homemade Forest Tutorial
Posted: December 13th, 2010, 13:21
Forests are a part and parcel of the Wood Elf army; rarely will a battlefield not have at least one wood or forest, and for each Pitched Battle involving Wood Elves, we are allowed to place a free wood in our half of the table. As such, the humble wood is the most important terrain piece for any Wood Elven general.
Gaming aside though, woods are also very easy to make and can result in stunning terrain pieces to augment a display board or gaming board alike. Here we present Gwinn's method of how to build your own homemade forest
You will need:
A piece of styrofoam, the size of your desired forest, about 1" thick.
White glue (PVA)
Sand; regular sand pit stuff will do.
About 5m of 1.2mm copper wire; can be a bit thicker
About 10m of 0.8mm copper wire; can be a bit thinner
Toilet paper / paper towels
Static grass
Modelling flock in the colour your forest will be. You can also mix 2 or more colours.
2m of rough rope, as stringy as possible. I used a special "Eco friendly" rope, made of natural materials.
A pair of pliers
Sandpaper
A sharp knife
Scissors
Acrylic paint; Citadel colours will do.
Old brush to apply PVA, one smaller brush to drybrush.
Plant Mister
1. Draw the desired shape of your forest on the styrofoam, then cut it out.
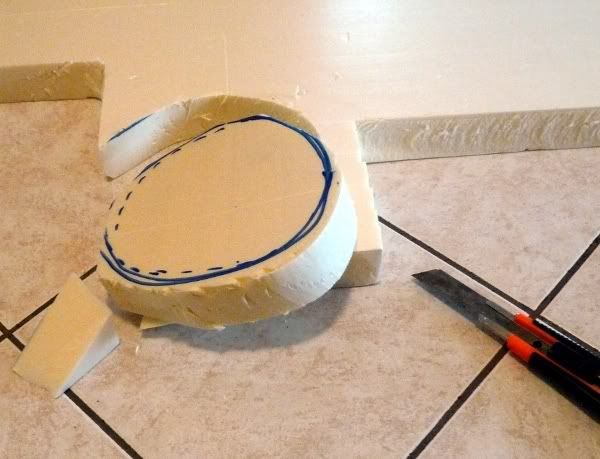
2. Cut the edges of the base to remove unnatural edges.

3. Sand down the base of your forest to remove any sharp edges left. You don't have to be super careful, just make sure the shape is OK.

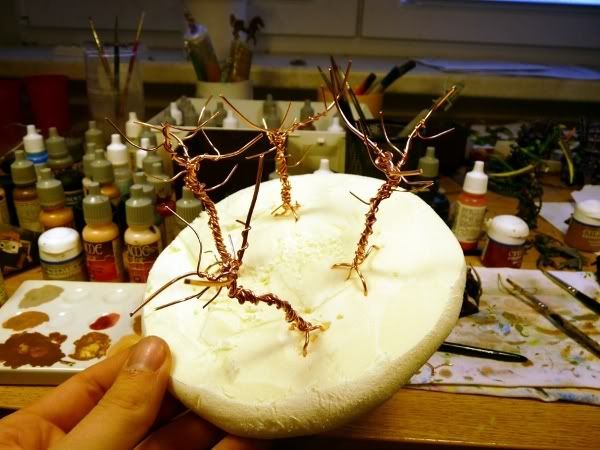
4. Cut 3-5 pieces of your thicker copper wire, 15-25 cm long. It is better if the pieces are not the same length, to get a random look. This will give you trees about 15cm tall.
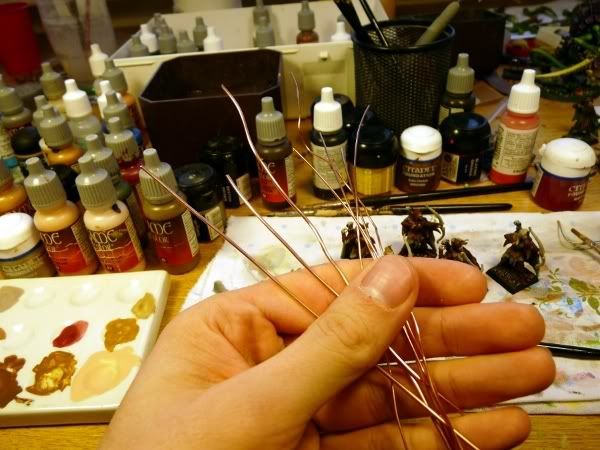
5. Grab all the pieces about 3cm from the bottom then twist the middle part until there are no loose pieces. Make sure you leave about half the length untwisted towards the top and about 4cm at the bottom.
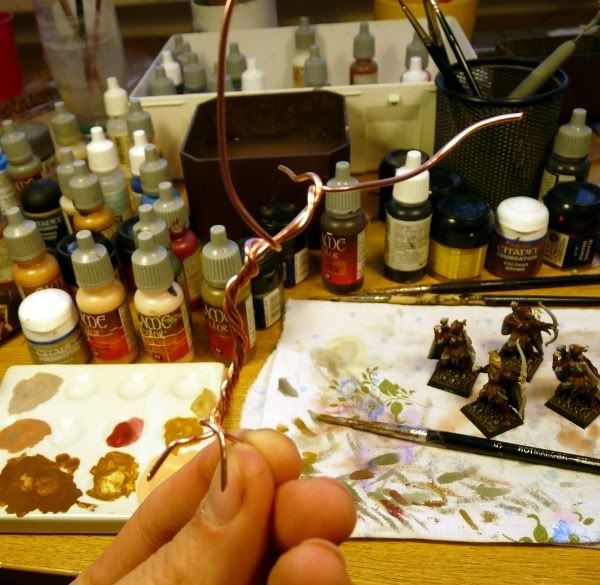
6. This will form the trunks and bigger branches of your trees. Play with the armature to get the desired look. You can bend it any way you like. Make sure to spread the "roots" apart, because these will anchor your tree to the base.
7. Start adding the thinner wire. You can twist it on from the bottom, or you can insert it inside the middle and then twist it around the bigger branches. Try to make a natural looking treetop.
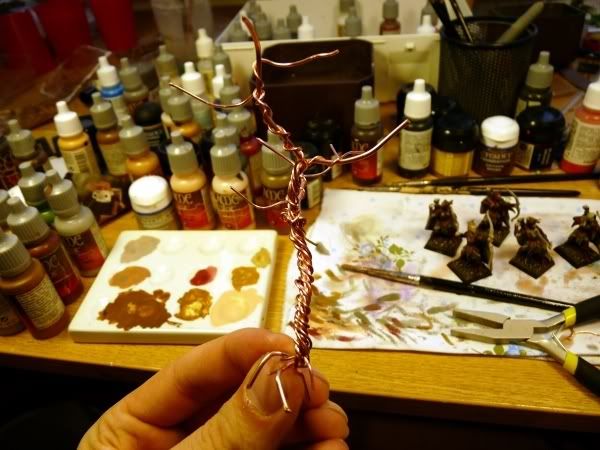
8. Once you have enough trees, stick them into your base as you see fit. You can glue them with PVA if you want, but it is not necessary.
9. Prepare a mix of one part PVA glue and four parts water. Then soak a piece of toilet paper in it and lay it on your base over the "roots" of your trees. To improve adhesion, paint your PVA mix over the pieces until they stick to the base. Repeat many times to completely cover the wire. If you want to spray your base, it is a good idea to cover all the styrofoam as well. Do the same for your trunks to give them bulk. You can make interesting bark-like textures using the brush by stroking the trees vertically.
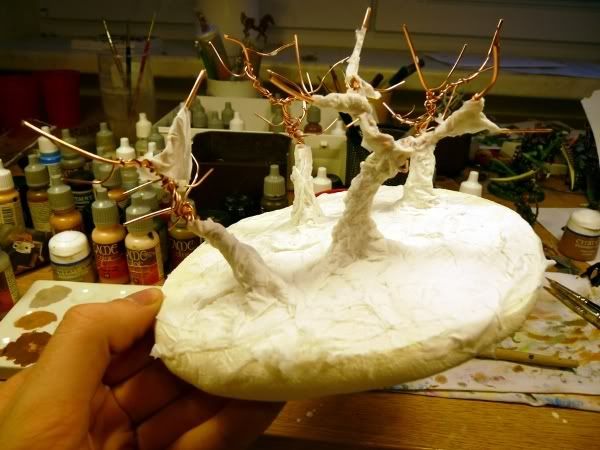
9. It is best to let the whole piece dry for several hours after you have the base and the trunks covered. Then repeat the same process for the smaller branches. In the end, you should have everything covered in toilet paper. If you make a mistake, use more water and your brush to smooth it out.
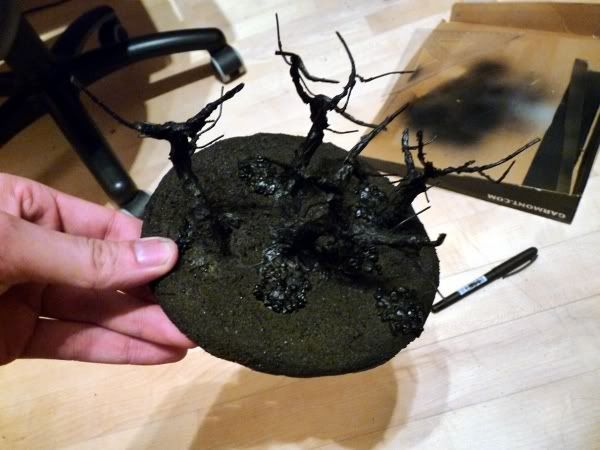
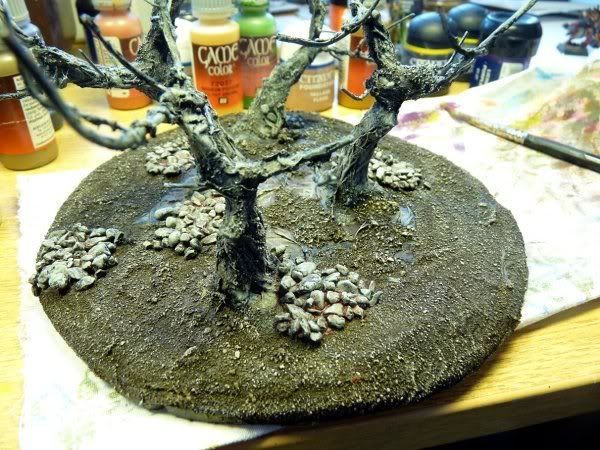
10. Let it dry, then paint random spots on the base with PVA glue and sprinkle with sand. You can add bigger stones at this point if you like.
11. Spray your forest in black, or paint it black with acrylic colour. Make sure to cover everything.
12. Time to start painting. For the ground, I used a Scorched Brown drybrush, followed by VGC Earth (you can use any medium brown). The final highlight is done with 50% VMC Ivory (Bleached Bone) and 50% VGC Earth. If you like more contrast, give it one more highlight with just VMC Ivory (Bleached Bone)
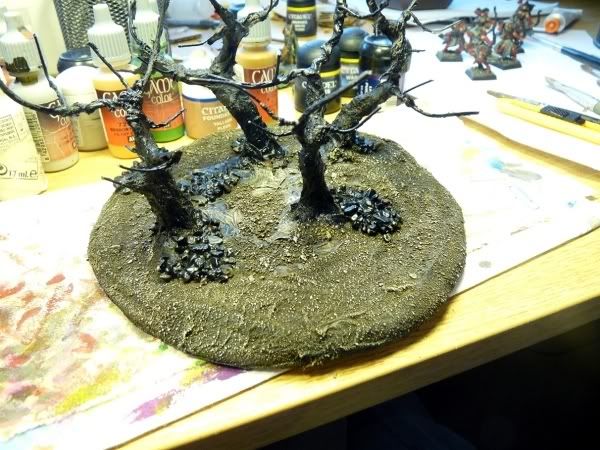
13. The trees are heavily drybrushed with VGC Cold Grey (Codex Grey) + VGC Cayman Green (Camo Green), then highlighted with VGC Stonewall Grey (Fortress Grey) + VGC Cayman Green. Apply a wash of Devlan Mud, then drybrush once more with VGC Stonewall Grey + VGC Cayman Green.
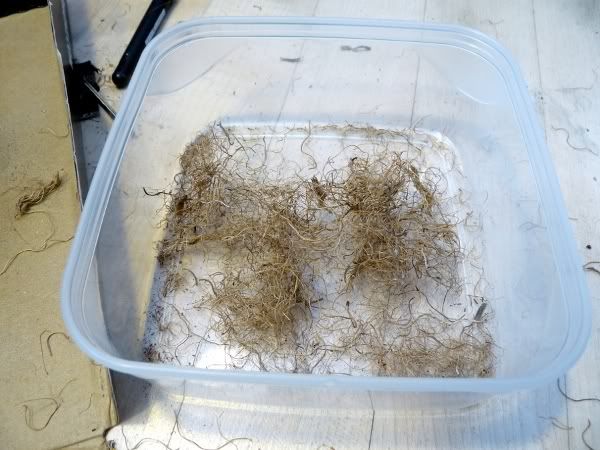
13. To make the foliage, you need a rough rope. Cut it into 5cm pieces and untie them into individual strings. You will need quite a bit of this. You can skip this step if your modelling store has something like this for sale. I could not get this, so I had to make my own.

***Editor's Note***
There are several different types of material that could be used to make the foliage, such as rubberised horse-hair, foliage matting for model railways, coir matting etc. The choice of material you use depends entirely on personal taste and what you have available.
***
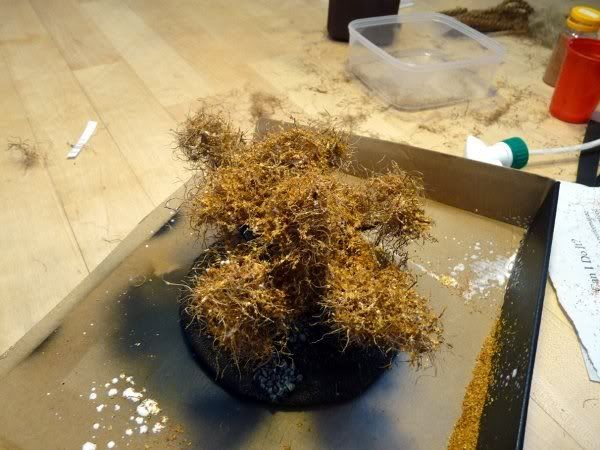
14. Tree by tree, apply undiluted PVA glue to the branches where you want the leaves to be. Stick small clumps of rope strings on there. Let the branches dry. Shake off any excess and repeat. After a while, you can glue the rope to other rope to make bigger clumps.
15. Make sure the coverage of strings is about as thick as you want your final trees to be. The foliage added in the next step does not make the treetops much bulkier.

16. Spray the trees with a plant mister filled with 1:5 PVA and water. It is a good idea to cover the base at this step, as it will drip down. After you have the treetops covered in drops of white glue, sprinkle your flock on the trees. Repeat this step several times, until you get a good coverage. Let the trees dry, and make sure you clean the plant mister with lots of water to keep it functional. You can of course use any other spray-on glue at this step. I just found this method to be a lot cheaper and it gave me more resilient trees.
17. You can prune your trees with scissors to get the shape you want and to remove any stray "branches". If you feel you need bulkier trees, you can repeat any of the previous steps and just glue more foliage on.
18. Apply PVA to the base in random splotches. Sprinkle with static grass.

19. You can glue birch seed pods to the base to represent fallen leaves.
20. Spray your forest with varnish, let it dry and enjoy!

So there you have it! A quick, cheap and easy way to get a fantastic looking terrain piece that is perfect for us Wood Elves!
Written by: gwinn
Comment: Here
Gaming aside though, woods are also very easy to make and can result in stunning terrain pieces to augment a display board or gaming board alike. Here we present Gwinn's method of how to build your own homemade forest
You will need:
A piece of styrofoam, the size of your desired forest, about 1" thick.
White glue (PVA)
Sand; regular sand pit stuff will do.
About 5m of 1.2mm copper wire; can be a bit thicker
About 10m of 0.8mm copper wire; can be a bit thinner
Toilet paper / paper towels
Static grass
Modelling flock in the colour your forest will be. You can also mix 2 or more colours.
2m of rough rope, as stringy as possible. I used a special "Eco friendly" rope, made of natural materials.
A pair of pliers
Sandpaper
A sharp knife
Scissors
Acrylic paint; Citadel colours will do.
Old brush to apply PVA, one smaller brush to drybrush.
Plant Mister
1. Draw the desired shape of your forest on the styrofoam, then cut it out.
2. Cut the edges of the base to remove unnatural edges.
3. Sand down the base of your forest to remove any sharp edges left. You don't have to be super careful, just make sure the shape is OK.
4. Cut 3-5 pieces of your thicker copper wire, 15-25 cm long. It is better if the pieces are not the same length, to get a random look. This will give you trees about 15cm tall.
5. Grab all the pieces about 3cm from the bottom then twist the middle part until there are no loose pieces. Make sure you leave about half the length untwisted towards the top and about 4cm at the bottom.
6. This will form the trunks and bigger branches of your trees. Play with the armature to get the desired look. You can bend it any way you like. Make sure to spread the "roots" apart, because these will anchor your tree to the base.
7. Start adding the thinner wire. You can twist it on from the bottom, or you can insert it inside the middle and then twist it around the bigger branches. Try to make a natural looking treetop.
8. Once you have enough trees, stick them into your base as you see fit. You can glue them with PVA if you want, but it is not necessary.
9. Prepare a mix of one part PVA glue and four parts water. Then soak a piece of toilet paper in it and lay it on your base over the "roots" of your trees. To improve adhesion, paint your PVA mix over the pieces until they stick to the base. Repeat many times to completely cover the wire. If you want to spray your base, it is a good idea to cover all the styrofoam as well. Do the same for your trunks to give them bulk. You can make interesting bark-like textures using the brush by stroking the trees vertically.
9. It is best to let the whole piece dry for several hours after you have the base and the trunks covered. Then repeat the same process for the smaller branches. In the end, you should have everything covered in toilet paper. If you make a mistake, use more water and your brush to smooth it out.
10. Let it dry, then paint random spots on the base with PVA glue and sprinkle with sand. You can add bigger stones at this point if you like.
11. Spray your forest in black, or paint it black with acrylic colour. Make sure to cover everything.
12. Time to start painting. For the ground, I used a Scorched Brown drybrush, followed by VGC Earth (you can use any medium brown). The final highlight is done with 50% VMC Ivory (Bleached Bone) and 50% VGC Earth. If you like more contrast, give it one more highlight with just VMC Ivory (Bleached Bone)
13. The trees are heavily drybrushed with VGC Cold Grey (Codex Grey) + VGC Cayman Green (Camo Green), then highlighted with VGC Stonewall Grey (Fortress Grey) + VGC Cayman Green. Apply a wash of Devlan Mud, then drybrush once more with VGC Stonewall Grey + VGC Cayman Green.
13. To make the foliage, you need a rough rope. Cut it into 5cm pieces and untie them into individual strings. You will need quite a bit of this. You can skip this step if your modelling store has something like this for sale. I could not get this, so I had to make my own.
***Editor's Note***
There are several different types of material that could be used to make the foliage, such as rubberised horse-hair, foliage matting for model railways, coir matting etc. The choice of material you use depends entirely on personal taste and what you have available.
***
14. Tree by tree, apply undiluted PVA glue to the branches where you want the leaves to be. Stick small clumps of rope strings on there. Let the branches dry. Shake off any excess and repeat. After a while, you can glue the rope to other rope to make bigger clumps.
15. Make sure the coverage of strings is about as thick as you want your final trees to be. The foliage added in the next step does not make the treetops much bulkier.
16. Spray the trees with a plant mister filled with 1:5 PVA and water. It is a good idea to cover the base at this step, as it will drip down. After you have the treetops covered in drops of white glue, sprinkle your flock on the trees. Repeat this step several times, until you get a good coverage. Let the trees dry, and make sure you clean the plant mister with lots of water to keep it functional. You can of course use any other spray-on glue at this step. I just found this method to be a lot cheaper and it gave me more resilient trees.
17. You can prune your trees with scissors to get the shape you want and to remove any stray "branches". If you feel you need bulkier trees, you can repeat any of the previous steps and just glue more foliage on.
18. Apply PVA to the base in random splotches. Sprinkle with static grass.
19. You can glue birch seed pods to the base to represent fallen leaves.
20. Spray your forest with varnish, let it dry and enjoy!
So there you have it! A quick, cheap and easy way to get a fantastic looking terrain piece that is perfect for us Wood Elves!
Written by: gwinn
Comment: Here